Many people whined about how hard the last assignment was (exercise 4). In response, I will teach you some advanced techniques to help you with this assignment.
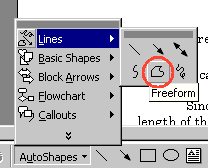
Numerous people have asked me how to make certain objects in certain assignments that were not Autoshapes or circles/rectangles. If you don't know by now, the answer is the polygon tool command. I covered this in example 1 and will now go over it again, in more detail. The polygon tool is one of the most versatile tools. It lets you draw any shape defined by setting down points. The tool is in AutoShapes->lines->freeform (another name for it). The words "freeform" only appear if u place your mouse cursor over the button for 2-5 seconds. It looks like this:

Now, simply click on the screen to start your shape. Keep on clicking on the screen to set more points for the shape. When you are finished, either complete the polygon by click back at the starting point OR double-click to leave it a open shape.
The curve tool is very similar to the polygon tool. You do the same thing, except the "lines" connecting the points are now curves. The curve tool in the button on the left side of the freeform tool.
On the right side of the freeform tool is the scribble tool. This simply lets you draw figures by hand (sort of like the familiar "pencil" tool in paint). You must hold down the mouse button while drawing. The same effect can be accomplished by holding down the mouse in freeform mode.
These three tools let you draw virtually anything. There are a few tricks to edit your drawn figures so they can be more accurate. This ONLY works for figures drawn using freeform, curve or scribble.
First of all, right click the drawn figure, you will see a list of commands:

You will focus on the two commands: Edit Points and Open Curve. Open Curve is a relatively useless command that simply "opens" the polygon IF you closed it by setting the end point and the start point the same. The best way to understand it is to just try it.
The Edit Points command is a very powerful command that will let you move EACH of the critical points of that figure. In Edit Points Mode, you will see the points that define the figure as little black squares. You can move them by dragging them:

If you right click on a point, you will see new commands in the menu. You will have different options for the point: Auto point, Smooth point, Straight point, Corner point. These names should be pretty logical. Smooth point will make that edge smoother or curved. You can also Delete the point by choosing Delete Point. If you right-click on an empty space on the lines of the figure, you can add points by choosing Add Point. If you right-click on a line/curve segment, you can choose it to be curved or straight. You can also delete the segment. These commands are all in the menu resulting from right-clicking.
You you haven't noticed already, Word makes you draw on a invisible grid system. You can only make your points at certain intervals on the screen. Therefore it is sometimes frustrating when you cannot draw small things to great detail (or if you cannot align something with something else).
There are 2 easy solutions. The first is to draw this detailed object very large, so the grid does not get in the way. Then, simply group it and scale down to the right size.
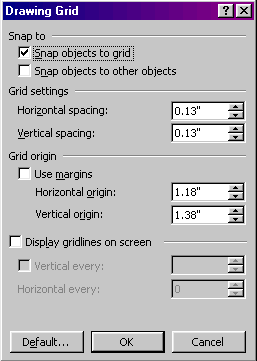
The second method involves changing the grid. Click Draw->Grid:

A window will pop up:

Here, you have control of the grid. One solution is to simply turn the grid off, by UNCHECKING "Snap objects to grid." This mode however is very hard to control if your drawing incorporates straight horizontal or vertical lines. Another, probably wiser, solution is to just change the grid spacing. The default is 0.13". You can make it as small as 0.01". Click OK to apply the settings. Now you should be able to draw more freely on the screen.
A very helpful technique while drawing detailed objects is to zoom in while working. To zoom, change the zoom factor on the top toolbar. You can enter your own percentage or choose one from the list:
