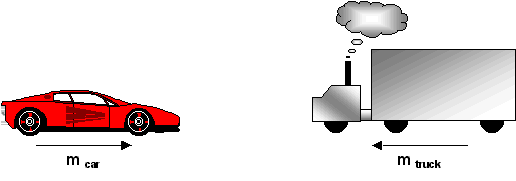
For our first example, we will create this picture of a car
and a truck about to collide:
Lets begin to opening up Word with a new document. The car is obviously not
created by MS Draw. It is clipart. Follow the instructions below to insert the
car:
Click
on the ClipArt button (refer to the drawing tool bar page)
A
ClipArt Gallery will pop up. This gallery is different depending on the
version of Word you have. Find the search tool and search for “car.” If
you cannot find the same car, just use another. Select the desired picture
and press Insert (Press the first button that pops up when you click the
picture in Word 2000 and Word XP)
Now
the picture is in Word. Right click on it and click on Format Object. Go to
the layout tab and you should see a bunch of pictures of lines and a dog.
Select the picture labeled: “In front of text.” Press OK to exit the
window.
Now
you can move the car around by dragging it. Move it to a desirable place.
You your judgment by looking at the final output.
Now lets create the truck. The truck is a combination of
objects that can be easily created. First we will create the basic outline of
the truck; then we will format it with colors and fills. Follow the instructions
below to create the truck:
Lets
draw the largest component of the truck: the large rectangle. Click on the
rectangle tool and drag from the top-left corner of the desired rectangle to
the bottom right corner. Use your judgment to determine the size of the
rectangle.
Next,
draw 2 circles for the wheels of the body of the truck using the circle
tool. (TIP: You can draw the circles separately, then drag them to the
right locations)
The
circles are now laying over the rectangle. To tuck them under the body of
the truck, right click on one of the wheels and select Order. A new menu
extends. Choose “Send to back.” Now one of the wheels is “under” the
rectangle. Do the same for the second wheel. (TIP: You can perform
operations for multiple objects at the same time. In this case, you can
click on one wheel, hold SHIFT and click on the other wheel. Now both
objects are selected. You can now right click on one of the objects and
perform the operations for both.)
Now lets draw the engine of the truck. Click AutoShapes, select Lines and
click on the center bottom image called Freeform. If you put your mouse over
the button for a while, it will display its name:
Freeform lets you draw the
lines of an object. Click to define the starting point. Move to a new
location and click to draw a line from the starting point to that point.
Keep on clicking at new locations to draw a whole chain of line segments.
This tool lets you draw almost anything you want. When you are done, you can
either click on the starting point again (for a closed polygon) or
double-click. In this case, we are making a closed polygon. Try to create a
shape something like this:.
You can draw it at another location and then drag it into the right place.
Draw
a rectangle in between the engine and the body as shown in the final output.
Draw
a wheel for the engine, as in steps 2 and 3.
Click
the Line tool. Draw a line from the top of the engine as in the final
output. The line is very thin. Click on the Line Style button and choose a
thickness of 4 ½ pts. This is the smokestack.
Click
on AutoShapes, select Callouts and click on the “Cloud callout”. Draw it
slightly behind the smokestack as in the final output picture. Now we can
move the trail of the cloud so it will look like its coming from the
smokestack. Select the cloud. Click on the yellow diamond and drag it to the
top of the smokestack.
Now
lets being formatting. Select the cloud and click on the arrow next to the
Fill Color button. Select Fill Effects. In the gradient tab, select One
Color. Select the color as white. Move the sliding bar towards dark. Select
From Center and choose the first variant. Your settings should look like
this:
Now press OK. Your cloud should look the same as the one in the output
picture.
Select
the engine and body to perform the appropriate fills.
Now,
hold shift and select all the objects that make up the truck. Right click
and select grouping;click
Group. Now you can move/scale the truck as a whole.
Draw
the two arrows below the car and the truck using the arrow button. Remember
that the arrow appears on the end of the line. Thus, if u dragged the line
from right to left, it will appear on the left end.
Use
the Textbox button to draw a box below one of the arrows. The box should be
big enough to contain the text. Write mcar below the car arrow
and mtruck below the truck arrow. Format the font to be Arial,
10pt. You may want to center the text for best results. Now your drawing is
complete!