Headers and Footers are text that appears on the top and bottom of every page. To add these in Word, go to the View Menu, and choose Header and Footer. Now you should be in the Header/Footer view. You will see the top part of the page with a dotted boxed. This is the header. You will also see the header and footer toolbar:
![]()
You can now type text in this header area. Remember that
anything you type here will appear on all pages of the document. Click the ![]() button to change from the header view to the footer view (and back). Now you can
type in the footer area. Remember that you can draw in these areas too. Anything
you draw in this mode will also appear on all pages. You may use things called
"fields" to insert special texts like page numbers, dates, time, etc.
To do this, just put your text cursor at the place where you want to insert one
of these and click the appropriate button on the header/footer toolbar. Here are
the buttons to do this:
button to change from the header view to the footer view (and back). Now you can
type in the footer area. Remember that you can draw in these areas too. Anything
you draw in this mode will also appear on all pages. You may use things called
"fields" to insert special texts like page numbers, dates, time, etc.
To do this, just put your text cursor at the place where you want to insert one
of these and click the appropriate button on the header/footer toolbar. Here are
the buttons to do this:
| Insert page number | |
| Insert total number of pages in the document (example for use: "page 4 of 10") | |
| Insert the current date (will change if you open the document another day) | |
| Insert the current time (changes as time progresses) | |
| Insert preset fields with the appropriate text |
You will notice that if you had inserted Page Numbers using the "Insert Page Numbers..." method, they will already be in the header or footer. Here is an example of a header (the line is draw in with the line tool):

To go back to the normal document mode, click "close" on the header
and footer toolbar. You will notice that the header/footers will be slightly grayed
out in the normal view. Don't worry, they will NOT print out that way.
Most people probably know how to create tables in Word. Just to review, there are 3 main methods:
Under the Table menu, choose Insert, and Table (may vary depending on version of Word):

Now you will be asked the number of rows and columns for the table. Enter them and press ok. The table will appear where your text cursor was last.
Find the "Insert Table" button on the standard toolbar. Click it, and a grid will appear. Drag your cursor across the grid to highlight the number of rows and columns you want to insert for your table. This method will have a limit: if you keep on dragging, you will reach the end of your screen, and that would be the maximum amount of rows/columns you will be able to insert. See below.

This is a flexible method for drawing tables that is only available in newer versions of Word. Click the Table menu and choose Draw Table. Now your mouse cursor will turn into a pencil and you can virtually "draw" your table. Drag your pencil across the document to create a rectangle (this will be the outer most frame of your table). Then drag lines up/down and left/right to create the inner lines. This method will let you draw advanced tables that do not necessarily have to have the same amount of rows and columns in each row or column. See below for some examples.

Notice the Tables and Borders Toolbar. You can view this toolbar by going to the View menu, choosing toolbars and choosing Tables and Borders. When you are done "drawing" the table, just click the draw toolbar button (1st button). With the erase button (2nd button) you can erase individual lines from the table.
Formatting Tables
Tables can be formatted to have different colors. You can change the line color and the fill color of the table. The fill color will change the fill of each cell (regularly white). Both of these features are in the Tables and Borders Toolbar. They can also be accessed by right-clicking the table and choosing Borders and Shading. However, when you right-click made sure you highlight the section of the table you wish to change.
To fill the cells with different colors, click the fill color button on the Tables and Borders Toolbar (not the one on the drawing bar). Choose you color by clicking the tiny arrow next to it. Now the cell where your text cursor was will be turned into your chosen color.
With the border line color button (pencil and a color) you can choose a color. However, it will not change anything. The next time you use the draw table command, it will draw the lines in that color.
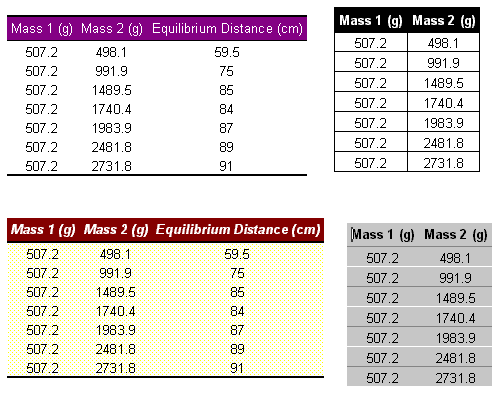
So far all the formatting techniques discussed require a lot of work and customizing. There is an easy way to format your tables in to colorful professional looking ones. Click anywhere in a table the go to the Table menu and choose Table AutoFormat. Now a window will appear with a list of predefined table styles. Choose one you like and press ok. Now your table will be in the style you chose:

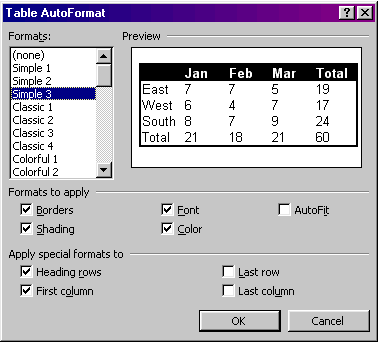
After clicking AutoFormat, a window will pop up:

The Table AutoFormat window also has some options you can check and uncheck. If you want to apply the Border/Shading/Font/Color styles of the table format you pick, you may check/uncheck them. Sometimes table format have special effects for the first row or the first column (called the heading row/column) such as bold text or a different shading color. These effects may be used or not used by checking/unchecking the options. The same can be done to the last row and last columns. There is also an option called AutoFit. This will shrink your table so that only the necessary space will be used. If your table has lots of empty space between the text and the borders, this may be a good option to check. Here are some table examples:
